


Step-by-step instructions for installing the security fix in JTL-Shop 5.0.X and 5.1.X
Note: Only versions of JTL-Shop 5 are affected. If you are using an earlier version, you do not need to install a security fix.
Instructions
Step 1: Check store version
Check whether you are using a version of JTL-Shop 5.0 or JTL-Shop 5.1.
- Log in to the back end of JTL-Shop.
- You can see the shop version of your JTL-Shop on your dashboard in the online shop information section.

Please note that in this case it is not important which exact version of JTL-Shop 5.0 or JTL-Shop 5.1 you are using. The number in the third position of the store version is not relevant. If your store version starts with 5.0 or 5.1, please follow these instructions.
Step 2: Download and set up FileZilla
- To be able to install the security fix manually, you need an FTP program, for example FileZilla. FileZilla is a free FTP client. Please download FileZilla here.
- Start FileZilla. You will see the following dialogue box:

3. enter your FTP access data in the Server, Username, Password and Port fields at the top left. If you do not have this access data, please contact your hosting service provider. Large hosting providers often offer guide or FAQ entries for connecting or logging in to the FTP sever.
4. click on the Connect button.
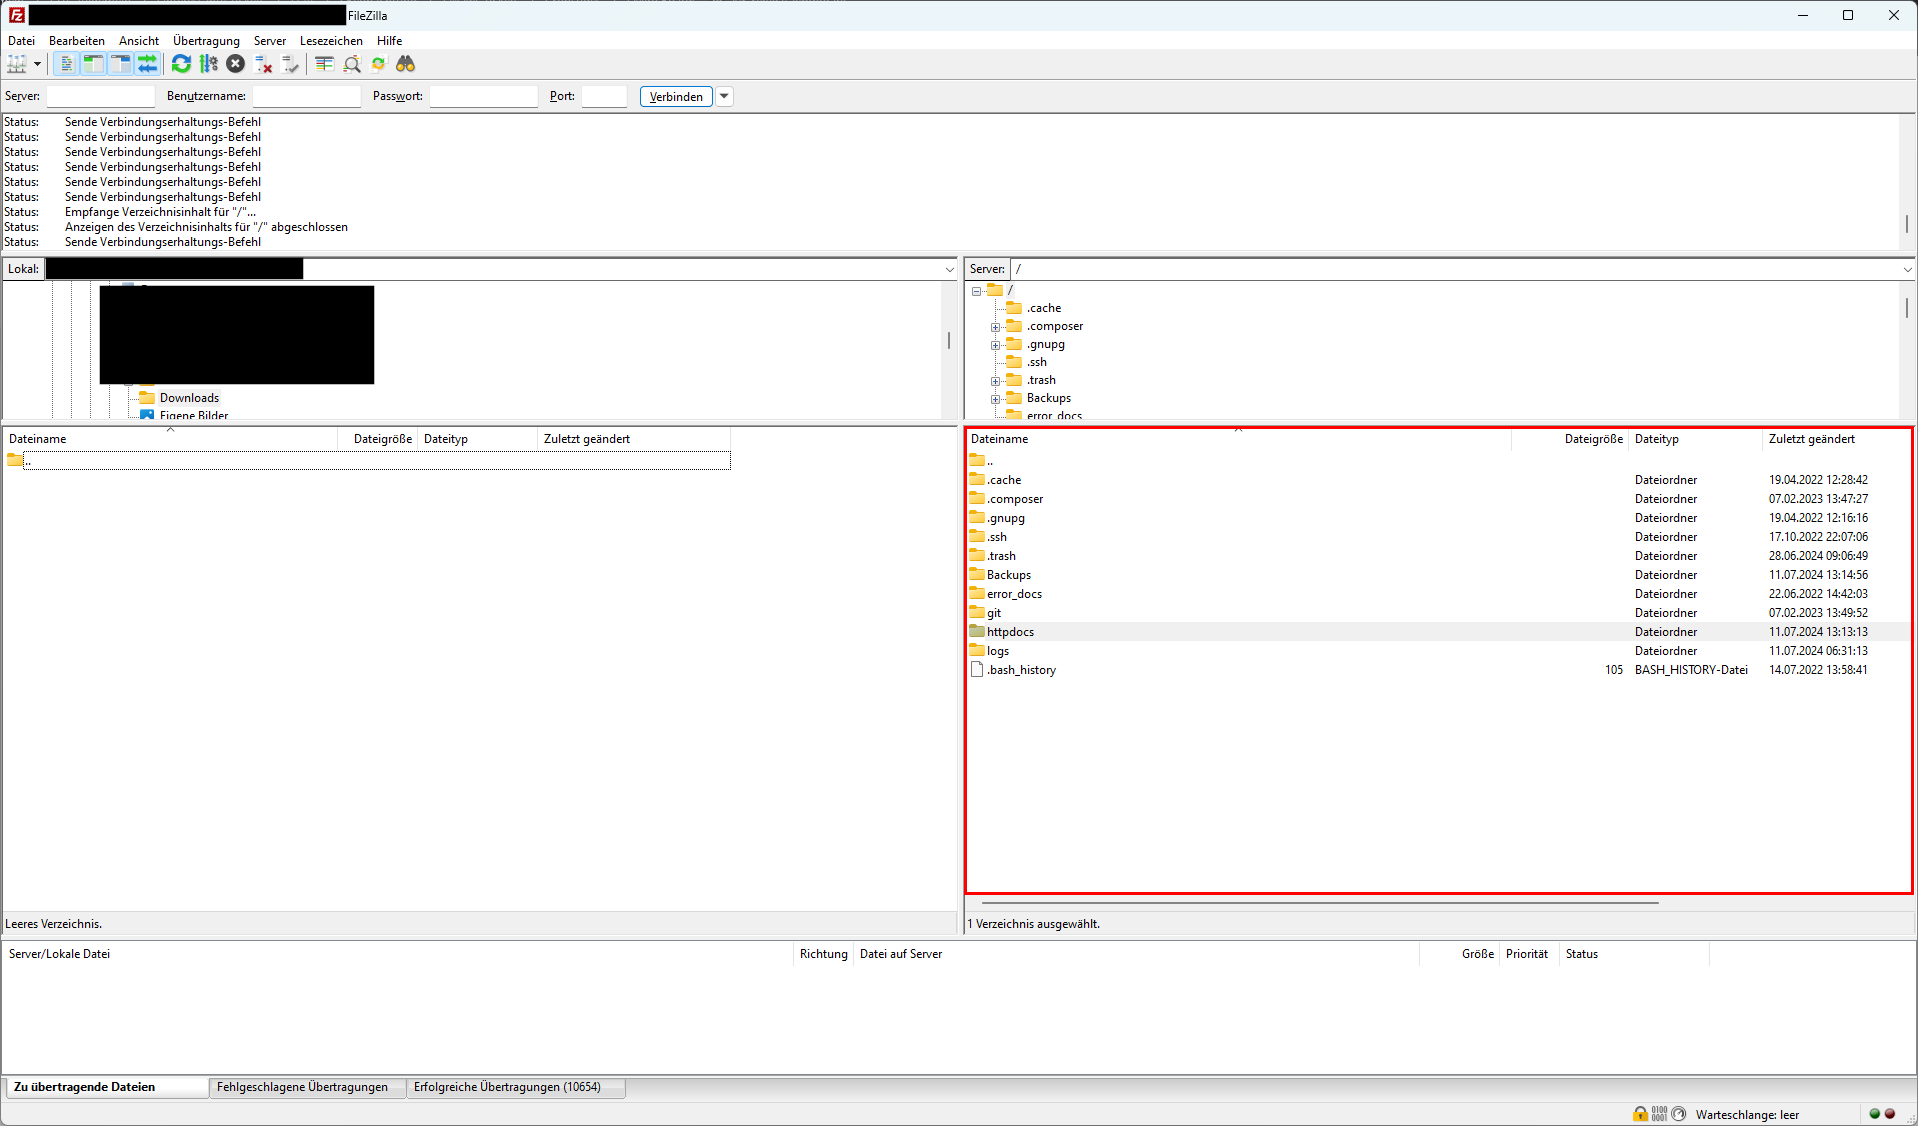
5. if you are successfully connected, you will see the file structure on your web space in the Server area on the right-hand side. You are now in the root directory of your hosting.
6. double-click on the httpdocs file to open this file and go to the main directory of your JTL-Shop.

Which directory you see after connecting and where the main directory of your JTL-Shop is located is different for each hosting service provider. If you cannot find your JTL-Shop main directory, ask your hosting service provider for support.
Step 3: Make the security fix
Your JTL-Shop main directory should look like this:

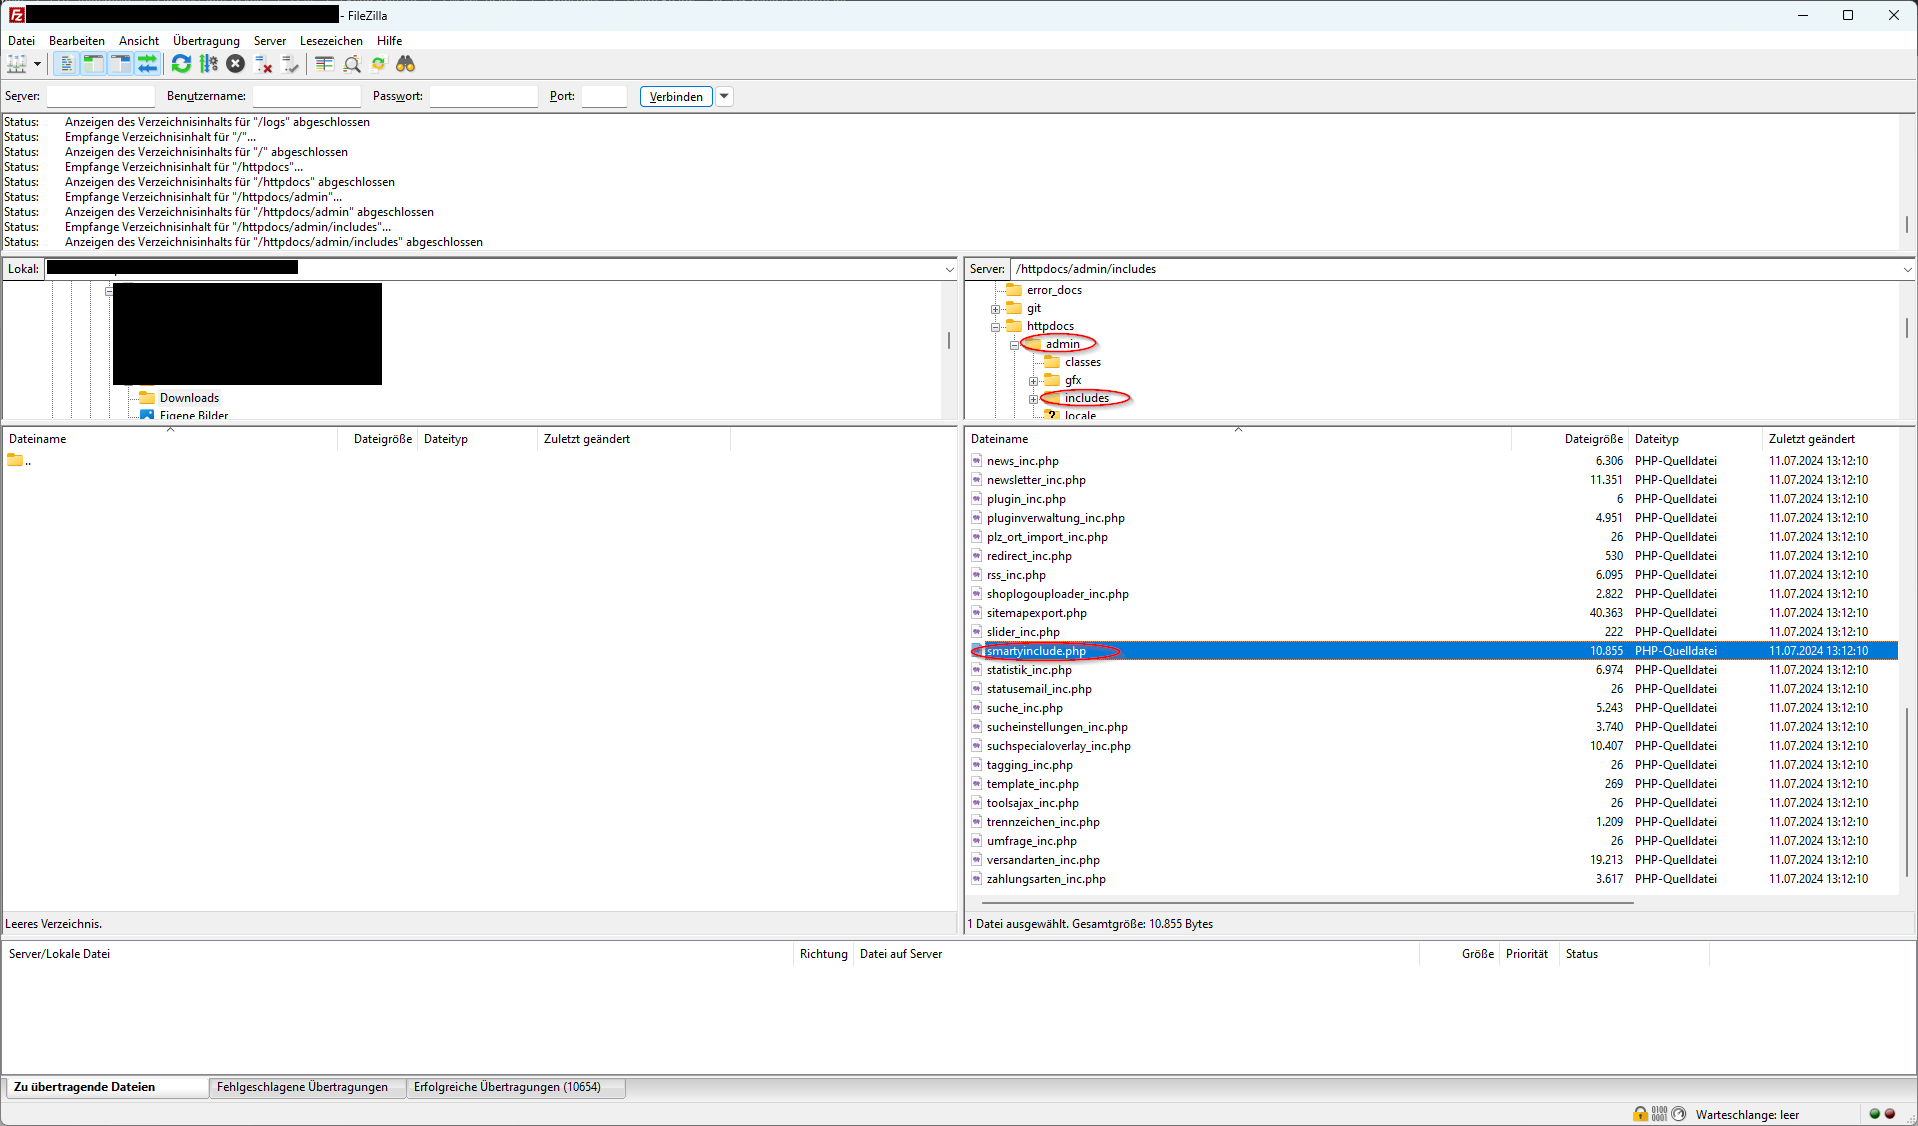
- Double-click on the admin directory. A tree structure opens.
- Double-click on the includes directory in the tree structure. The admin/includes directory opens.
- Left-click on the smartyinclude.php file to select this file.
4. right-click on the smartyinclude.php file to open the context menu and select the Download option.

The smartyinclude.php file is stored in a local location on your device and is displayed on the left-hand side of the dialogue box in the Local area. You can see the exact path of the local file in the text field next to the Local label.

5. right-click on the smartyinclude.php file to open the context menu.
6. click on either the Open or Edit option in the context menu. It makes no difference which of the two options you choose.
Note: If you have not yet set a default program for PHP files in FileZilla, you will be asked which program you would like to open the file with before opening it. Select a text editor here, e.g. the Editor app on Windows devices or the Notepad app.
7. when you have opened the file, use the key combination Ctrl+F to search for the following text:
if (Request::postVar('action') === 'disable-expired-plugins' && Form::validateToken()) {
Depending on the exact store version, you will find this text in line 187 or one of the lines just above or below it:
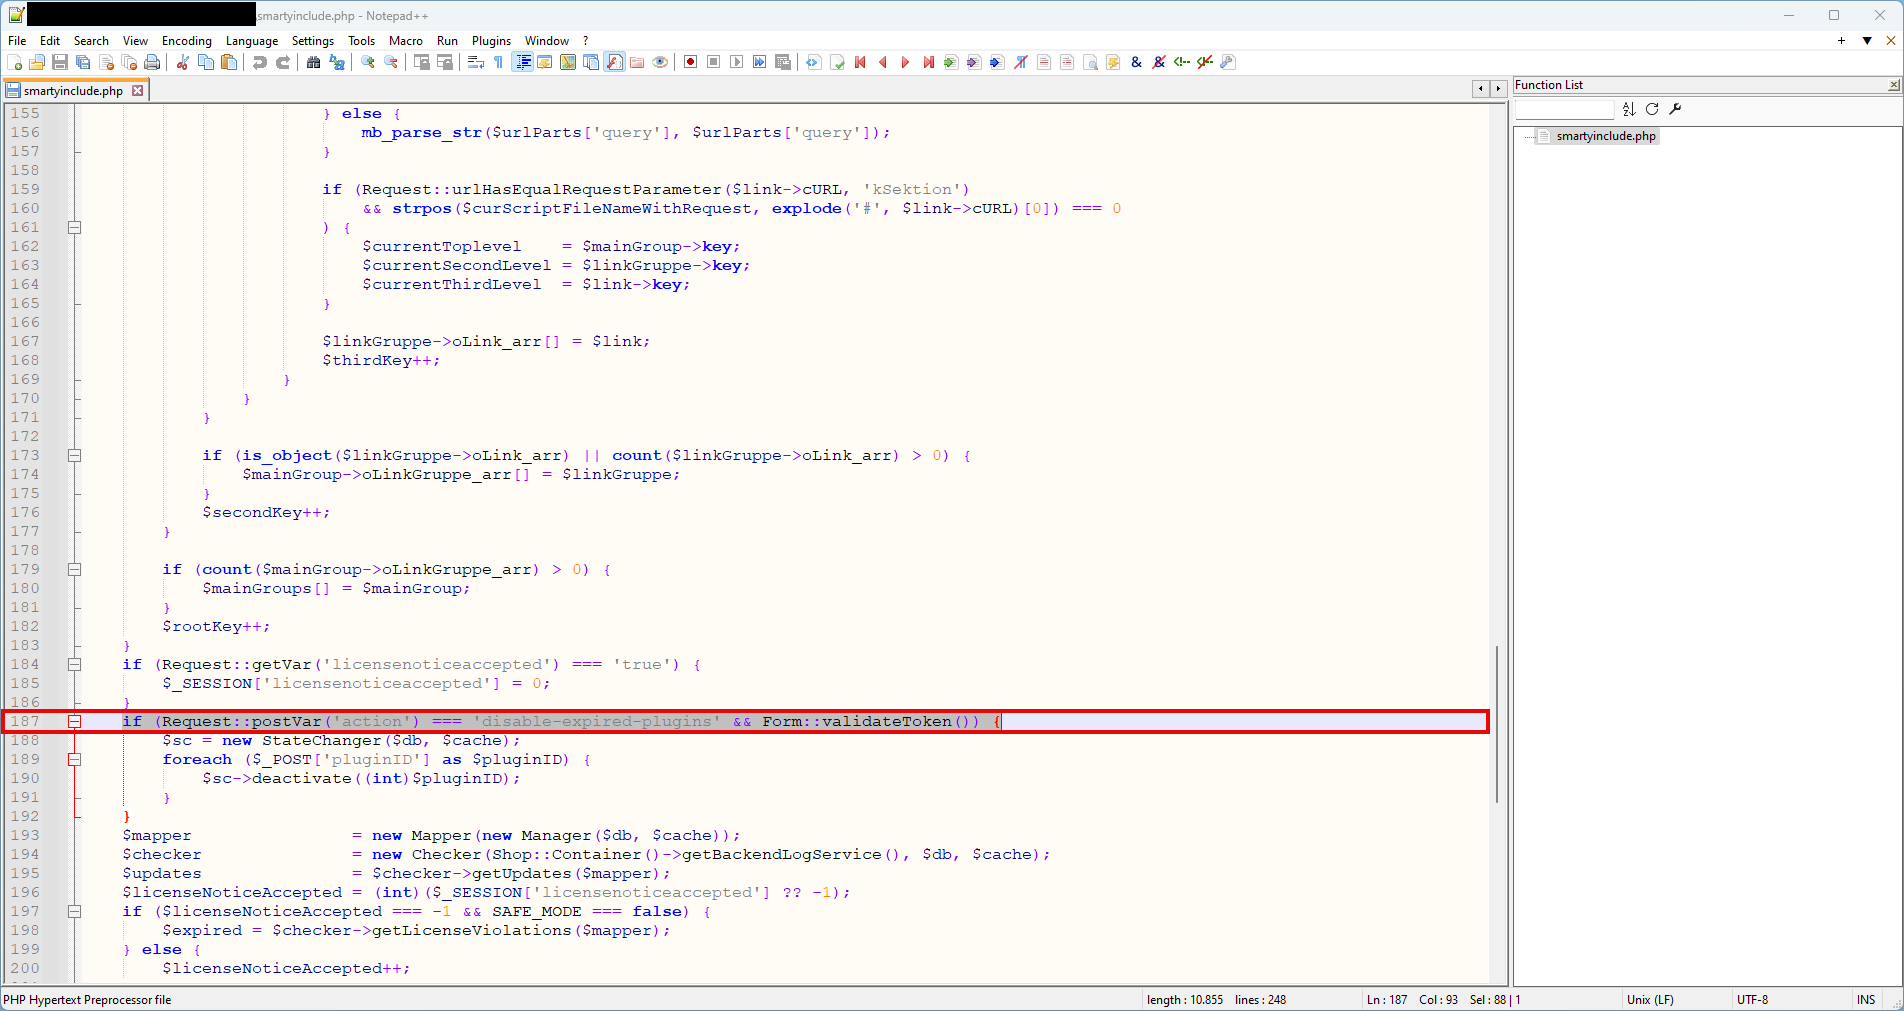
8. replace this line with the following line:
if ((int)$_SESSION['AdminAccount']->kAdminlogin > 0 && Request::postVar('action') === 'disable-expired-plugins' && Form::validateToken()) {
After you have replaced the line, the file should look like this:

9. save your changes.
10. switch back to FileZilla.
11. left-click on the file smartyinclude.php in the Local area of FileZilla to select this file. This file contains your changes.
12. right-click on the smartyinclude.php file to open the context menu and select the Upload option.

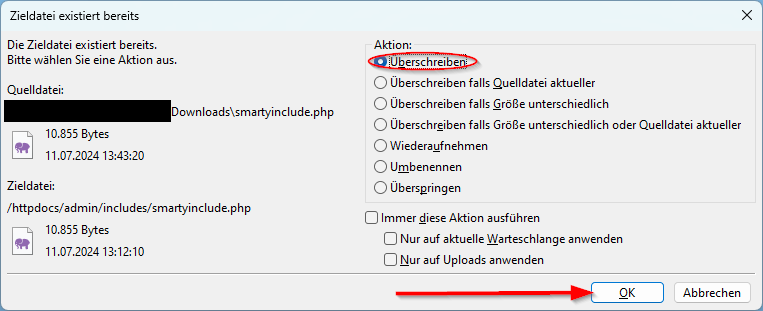
13. you will be asked to confirm that you want to overwrite the existing file. Make sure that the Overwrite option is selected in the Action area.
14. click OK to confirm the query. The file is uploaded.
15 In the Successful transfers area, check whether there is a 1 after the name in brackets. If this is the case, your modified file has been successfully transferred. If there is a 0, try uploading the file again. If another attempt does not work, please contact your hosting service provider and ask them for support.

You have successfully installed the security fix.
Step-by-step instructions for installing the security fix in JTL-Shop 5.2.X and 5.3.X
Note: Only versions of JTL-Shop 5 are affected. If you are using an earlier version, you do not need to install a security fix.
Instructions
Step 1: Check shop version
Check whether you are using a version of JTL-Shop 5.2 or JTL-Shop 5.3.
1. Log in to the back end of JTL-Shop.
2. You can see the shop version of your JTL-Shop on your dashboard in the online shop information section.

Please note that in this case it is not important which exact version of JTL-Shop 5.2 or JTL-Shop 5.3 you are using. The number in the third position of the store version is not relevant. If your store version starts with 5.2 or 5.3, please follow these instructions.
Step 2: Download and set up FileZilla
1. to be able to install the security fix manually, you need an FTP program, for example FileZilla. FileZilla is a free FTP client. Please download FileZilla here.
2. start FileZilla. You will see the following dialogue box:

3. enter your FTP access data in the Server, Username, Password and Port fields at the top left. If you do not have this access data, please contact your hosting service provider. Large hosting providers often offer guide or FAQ entries for connecting or logging in to the FTP sever.
4. click on the Connect button.
5. if you are successfully connected, you will see the file structure on your web space in the Server area on the right-hand side. You are now in the root directory of your hosting.
6. double-click on the httpdocs file to open this file and go to the main directory of your JTL-Shop.
Which directory you see after connecting and where the main directory of your JTL-Shop is located is different for each hosting service provider. If you cannot find your JTL-Shop main directory, ask your hosting service provider for support.
Step 3: Make a security fix
Your JTL-Shop main directory should look like this:

1. double-click on the admin directory. A tree structure opens.
2. double-click on the includes directory in the tree structure. The admin/includes directory opens.
3. left-click on the file admininclude.php to select this file.

4. right-click on the admininclude.php file to open the context menu and select the Download option.

The admininclude.php file is stored in a local location on your device and is displayed on the left-hand side of the dialogue box in the Local area. You can see the exact path of the local file in the text field next to the Local label.

5. right-click on the php file to open the context menu.
6. click on either the Open or Edit option in the context menu. It makes no difference which of the two options you choose.
Note: If you have not yet set a default program for PHP files in FileZilla, you will be asked which program you would like to open the file with before opening it. Select a text editor here, e.g. the Editor app on Windows devices or the Notepad app.
7. when you have opened the file, use the key combination Ctrl+F to search for the following text:
if (Request::postVar('action') === 'disable-expired-plugins' && Form::validateToken()) {
Depending on the exact store version, you will find this text in line 90 or one of the lines just above or below it:

8. replace this line with the following line:
if ((int)$_SESSION['AdminAccount']->kAdminlogin > 0 && Request::postVar('action') === 'disable-expired-plugins' && Form::validateToken()) {
After you have replaced the line, the file should look like this:

9. Save your changes.
10. Switch back to FileZilla.
11. In FileZilla, left-click on the php file in the Local area to select this file. This file contains your changes.
12. Right-click on the php file to open the context menu and select the Upload option.

13. you will be asked to confirm that you want to overwrite the existing file. Make sure that the Overwrite option is selected in the Action area.
14. Click OK to confirm the prompt. The file is uploaded.

In the Successful transfers area, check whether there is a 1 after the name in brackets. If this is the case, your modified file has been successfully transferred. If there is a 0 , try uploading the file again. If another attempt does not work, please contact your hosting service provider and ask them for support.

You have successfully installed the security fix.